

TeleToyland Sandbox How It Works: Step 1
Step 1: Parts
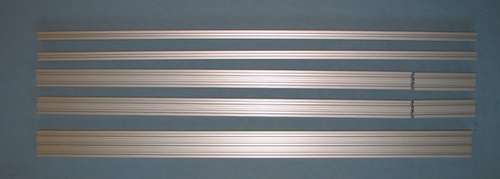
T-SLOT (~$85): We used the 1" 10 Series line from 80/20. We didn't look around too much, and there are definitely other manufacturers. The 80/20 product is available on Amazon and Ebay, as well as McMaster-Carr so it was easy to obtain. For this project, the 1" profile seemed good. The 20mm profile (about 3/4") flexed a bit at the spans we had. We have seen some nice CNC tables made with the 1.5" profiles - they look great, but we did not need that amount of strength for the Sandbox.
We used 1"x1" profiles for two of the X axis sides, 1"x2" profiles for the other two sides (to allow the Y axis rollers and drive belts more clearance), and a 1"x3" piece for the Y axis.
All pieces are 48" long
(2) 1x1"
(2) 1"x2" - cut 7" off the end of these to make the Y stage Chassis
(1) 1x3"
FRAME HARDWARE (~$90):
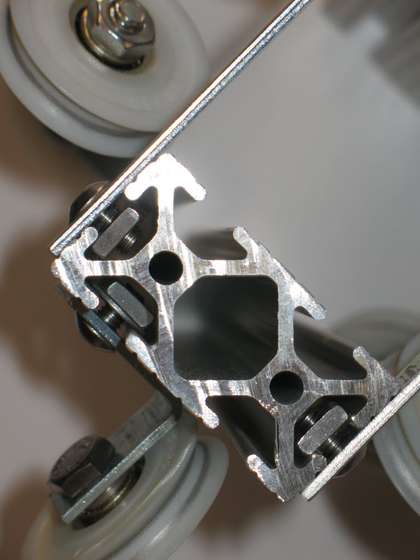
OK, we are going off the T-Slot script here. You can get very nice connectors from the manufacturers, and they work really well, but the cost can add up. For the 1" T-Slot, though, we found that #10 machine screws with square nuts works pretty well. The square nuts are better than hex since they won't spin in the slot. Also, they can just fit in sideways if you are in a situation where another screw is blocking the track. You can get these at the hardware store, or order them from McMaster-Carr - in stainless, but that is not a requirement. This hardware is available from many other sources.
For the list below, "M" is the McMaster-Carr part # - nothing special about them - just what we used. Small Parts Inc. might be a good source too. The screws and most of the plates can be found at local hardware / home improvement stores too - larger quantities, hex heads, stainless etc. may be easier to find at online parts suppliers or maybe you have a nice hardware store nearby, but for the lower quantity items, any old hardware store screws are fine too. We used the stainless ones - some people prefer the black oxide finish.
(4) 3/4" angle Brackets - to hold the 1x2 t -slot to the 1x1 t-slot to make the frame - we got them at OSH - The 7/8" ones at McMaster will work, but the holes are not consistent, so order a bunch and pick out the best ones. Just make sure the vertical side holes line up with the middle of the T-Slot. Getting extras of these is a good idea - we ended up using 4 more for the frame and you can also use them to hold the frame down to a workbench.
(8) 1" angle Brackets (M 1556A41) - for the Y axis carriage bearings
(4) 1.5" angle Brackets (M 1556A42) - for the X axis bearings - the main thing with these is that it's easier if the holes are in-line.
(4) 4" plates for the Y axis carriage (M 1394A34)
(42) 10-32 x 3/8" stainless screws - hex head (M 92949A263 - box of 100)
(4) 10-32 x 7/16" stainless hex head screws (M 92949A264 - box of 100 - way more than you need)
(46) 10-32 square nuts (M 94785A411)
(4) 10-32 washers (M92141A011)
(4) 10-32 split lock washers (M92146A550)
(12) 1/4-20 x 3/4" hex head cap screws (M 92240A540)
(12) 1/4-20 jam nuts (M 91847A029)
(12) 1/4-20 washers (M 92141A029)
(12) 1/4-20 split lock washers (M 92146A029)
(12) 1.5" (white) Nylon rollers (with brass ball bearings in the middle) for screen doors from Home Depot - this is the secret lower cost ingredient to this design! :-) They are Prime Line Products D1506 1-1/2" Sliding Glass Door Rollers. If you can't find the nylon ones, brass ones might work. The angle brackets in this project were based on the 1.5" diameter ones, so that is the important dimension.
For the angle brackets, you may need to drill out the holes that will be for the bearings to 1/4" for those 1/4" bolts. Some of the brackets we tried have holes that are big enough already - kind of hit-or-miss on that.
PULLEYS, BELTS AND BRACKETS (~$200):
We used the same pulleys and belts as the previous project since they have been working well. We greatly improved the brackets, though, and they can be made fairly easily with hand tools. The T-Slot really shines here since adjusting the belts is now super-easy.
Channel Aluminum: This is to make the brackets for the bearings. You will need at least 15" of 1.5"x1.5"x1/8" thick channel aluminum. McMaster-Carr may have this, but we got ours at Online Metals - 6063 T52 aluminum channel. 24" is $7.74. You will need to cut this into (6) 2.25" lengths, then drill two 1/2" holes in the sides and two 7/32" holes for the #10 bolts in the bottom of each (see step 5). Use a step drill for the 1/2" holes - it's way easier than trying to use a 1/2" bit.
(12) flanged bearings 1/4" inside diameter, and 1/2" outside diameter (just needs to match the holes in the aluminum channel) VXB.com Kit776 or similar (~$40/10 of them, or M 57155K323 - $5.70 each).
(12) thin washers (M 93574A513) - these keep the collars from touching the outsides of the bearings - saves buying extended flanged bearings.
(6) timing belt pulleys (M 57105K21)
(3) timing belts (M 6484K454)
(12) 1/4" shaft collars (M 9414T6)
(2) 1/4" shaft couplers for the motors - see step 7 for options with these
1/4" shaft (plain - not threaded) - ~44" for the long piece on the X axis to prevent racking, and (2) 2.25" pieces, and (2) 3.25" pieces. aluminum or steel should be OK.
(3) 2" plates to hold the timing belts down to the t-slot (M 1394A31)
MOTORS, ENCODERS, and CONTROLLER (~$200):
See step 7 for more detail, but you can drive this project in a number of ways. Stepper motors will work (our slightly under-powered setup cost about $100), but we decided to use the Pololu JRK 21v3 motor controllers ($50), with motors like the Lynxmotion GHM-16 ($22) - you can get those elsewhere - they are 12v 200RPM gearhead motors with 6mm shafts (nicely close to the 1/4" shafts we are using). We are using the same the 10-turn potentiometers from Jameco or Mouser etc. (Bournes 3540 series or similar ~$20). So, together, that's about $200. The advantage with this approach is that the position is absolute - no limit switches needed, but it's potentially less precise than steppers. The JRK controllers are easy to setup - they have a Windows app to calibrate and adjust them. You can control them from a Arduino or PC, or from a servo controller.
For the TeleToyland Sandbox, we control these with an Arduino ($30), and Ethernet Shield ($40).
Intro | 1 | 2 | 3 | 4 | 5 | 6 | 7 | 8 | 9